altered altoid Tin

I used the die cuts from the DT kit sent by K & A Die Cuts for this months ASB design team to make this cute little altered altoid tin purse.
I was inspired by a few on SCS before making this one myself. I would like to give credit to those who inspired me. First off credit to Lov'n Life in Vegas and then to Dyu and to Jwheeler
thanks to these talented ladies for inspiring me to try this.
In the DT sponsor kit were pieces cut to perfectly fit the inside or outside of an altoid tin and I wanted to do something different other than the standard album with the tin. I used them to cover the outside of the front of the tin and the back of the tin as well. I also punched holes all the way thru the tin to attach the ribbon straps with brads. I then added some patterned scrapbook paper to the inside to cover the holes and brads. I added a simple prima the the bottom corner of the front of the purse. This is now ready to hold a gift card or a piece of jewelry or some other small gift item.
February ASB Challenge!!
The February challenge from the altered Arts team over at ASB is to alter a treat container, something that the original purpose was to hold candy or some other sweet treat. You could completely re-purpose the container or just alter it and keep its original purpose.
I chose to alter a York mints tin. I like the tin because it is the perfect gift size. I chose to use an empty mint tin and re-purpose it. I think this could be used for mints to carry in your purse or as a gift container for small embellishments or even jewelry. I simply punched some scallops with my pinches and added a simple stamped design using the Stampin' Up! set Simply Said.
Charge.....and....CLEAR!! *zzaaapppp*
I think I may be able to revive this blog after all.
I have been busy the last couple of months with Holidays, after Holidays, moving, unpacking etc..
I also have been designing and posting my projects over at A Shade of Blue.
For the ASB January Project I altered a clock. I went to Walmart and spent approx $3 on a plain Jane wall clock and then I added some stamped images and a decoupaged Rooster to the face and....here is the final project.
I used new acrylic stamps that I purchased at A Cherry On Top
They are by Daisy Bucket Designs

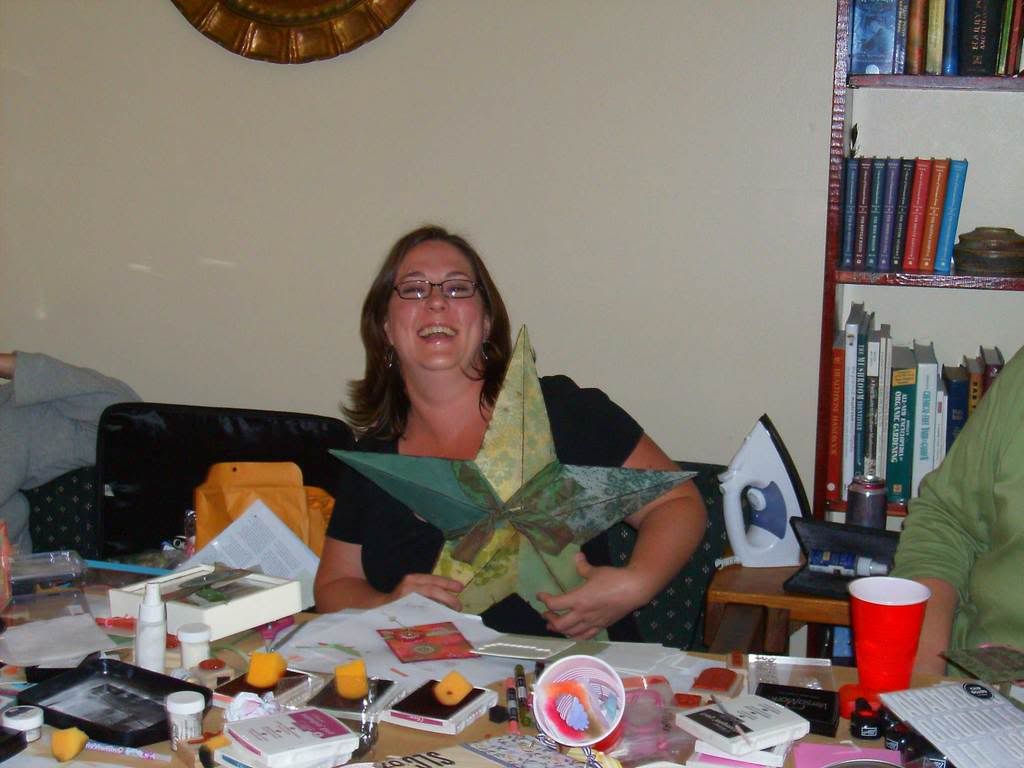
Christmas and Barn Stars
Have you seen the amazing and cool Altered Barn Stars everywhere?? There is an awesome project tutorial by Sande Kreiger on Twopeas
The first one I ever saw was made by Friend Linda, spicygingersnap (she made the star that the lovely texasjodylynn is holding in the picture) on SCS. Then jeanniebabes on SCS made a really wonderful star and so did jwheeler
I found my star at Craftwarehouse in Meridian Idaho. I bought papers from My mind's Eye, Around the Block and 1 other I can not remember..but they are all wonderful and festive! I made this today while recouping from a evil virus that has taken hold of our entire household this week. My poor 10 year old has been so sick the past week. I presented this to my Mom for Chrsitmas today so she can hange it in her home for the Holidays.
I used a plain piece of typing paper to trace the point shape and used it as a template to cut out paper for each point. I painted a thin layer of matte mod podge on the back pf the paper and adhere it to the star. I had some slight gaps so i adhered thin gold and red cord down the centers using UHU glue. Being thin cord it doesn't take away from the beauty of the papers. I painted a top coat of mod podge on to seal and voila1 it is done. Thanks for looking!
Altered Journal

About a month ago I altered a journal that I have had in my stash for over a year now. One of those times when you buy or are given things to alter and they pile up for a while...well i finally actually did a project and hope to continue to got through my stash of things.
The journal was the type that you find in the $1 store or at the $1 bin at Michaels or Target. I covered it with DP from Stampin' Up..The Outlaw collection. I used my ATG adhesive gun and some spray adhesive to adhere the paper to the journal. I covered the outside, the inside covers and the binding. I also stamped on the paper with versamark and then rushed over it with Pearl Ex in Russett. I then sprayed it with a clear sealer to seal the Pearl Ex. I used my oval punch from SU! to create the 'hinges' on the binding. The paper is Chocolate Chip cs that had been misted with water and wrinkled and smoothed several times and then pressed as flat as possible and it has the look of leather. I added the antique brads and twill to the binding. The guava colored ribbon is also from Stampin' Up! I used the Baroque Motifs stamp set for the scroll designs and the word 'Cherish' on the cover. I did the cracked glass technique on the 'cherish' oval. I wanted this to appear old and well loved. I am quite proud of this journal, the paper is so smooth with no wrinkles and the look is exactly how I had envisioned it before creating it. Thanks for Looking!
45 Years
 My parent will be celebrating their 45th wedding anniversary this month.
I was there for a visit in June and took a lot of family photos, well I get to back again next weekend so I decided I wanted to make them something special for their anniversary. I decided to dive into digital scrapbooking. I immediately went to over to twopeasinabucket
headed to the freebie section to see what I could find to inspire me.I chose this kit by Rhonna Farrer
The journaling on the page is song lyrics, by Big & Rich 'Lost in this moment'
I used Photoshop Elements 5.0 to create the digital page. I then resized it to print at 5.75"x5.75". I used very sharp paper snips to cut around the black scallops. I then mounted this onto some Regal Rose card stock. I used a big scalloped square from Sampin' Up's ginormous pieces chipboard set and covered it with some decorative paper from DCWV. First I watercolored all of the little flowers on the paper with Regal Rose classic ink and an aquapainter. I used my UHU twist and glue to adhere the paper to the chipboard...then as an after thought I used Modpodge over the top of the entire frame. I cut a piece of transparency sheet to fit on the inside of the frame where glass would be in a regular frame. I used my ATG adhesive gun for adhering all of the backing and transparency. I added ribbons and a couple of small wood charms from the Dollar Tree as embellishments. For the back of the frame I used 2 pieces of 12x12 cardboard that I trimmed to size and glued together to make them sturdier. All of the layers are permanently attached using the ATG adhesive gun.
My next problem was how is this frame to be displayed? Do i want them to hang it or sit it on a table or dresser or other piece of furniture? I went for sitting it up on a piece of furniture...
There was a funky little 'wing' sticking up out of the back and I just trimmed it off with scissors.


Subscribe To



 Posts
All Comments
Posts
All Comments
